Shape Dictionary
This is a great activity for students and parents because it covers many different academic areas. Students are using their math knowledge to make connections between shapes and things they see in real life. They are also using their literacy knowledge to write the sentence at the top of each page, to write the word to accompany the objects that they drew, and they are using their alphabetic skills to put the book in alphabetic order. Parents, this activity is a great way for you to help you child enhance all of these skills. Work with him or her to brainstorm and draw the pictures in the book, and help them sound out words as they write them. Do your best not to just give your child the spelling of a word, instead have them sound it out and if they need to, use their inventive spelling or kid writing. It is okay if the words are not spelled perfectly, it is just important for your child to use their phonetic skills to decode the words. Help your child put the book in alphabetic order by saying the alphabet with him or her, so they can listen and find the letter that comes next. Make sure you both sign your work when you are done, so you can both get credit and be proud of what you made!
Standards:
CC.2.3.2.A.1:
Analyze and draw two- and three-dimensional shapes having specified attributes.
CC.1.4.2.F:
Demonstrate a grade appropriate command of the conventions of standard English grammar and spelling.
Capitalize proper nouns.
Use commas and apostrophes appropriately.
Spell words drawing on common spelling patterns.
Consult reference material as needed.
CC.1.5.2.A: Participate in collaborative conversations with peers and adults in small and larger groups.
Materials: pencil, paper, crayons (or other coloring tool). binder or 3-ring folder.
How To Make It:
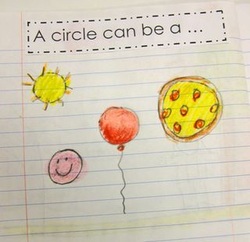
First, make sure you have your paper, pencil, and crayons, markers, or colored pencils. Have your child take one piece of paper and write "A circle can be..." at the top. Underneath, both you and your child can draw pictures of objects that look like circles, such as the sun, a smiley face, or a pizza. Have your child label each picture, so that they have practice writing as well as drawing. Then take the next page and do the same for the following shapes: rectangle, square, and triangle. Your child can also choose two of the following shapes: rhombus, pentagon, hexagon, or octagon. Once each page is drawn and labeled, have your child order them in alphabetical order, so they have a shape dictionary. Place the pages into a 3-ring folder or binder so you have a final finished project. Make sure you sign one of the pages, or you can make a cover sheet with both of your names so we know who made the dictionary!
This is a great activity for students and parents because it covers many different academic areas. Students are using their math knowledge to make connections between shapes and things they see in real life. They are also using their literacy knowledge to write the sentence at the top of each page, to write the word to accompany the objects that they drew, and they are using their alphabetic skills to put the book in alphabetic order. Parents, this activity is a great way for you to help you child enhance all of these skills. Work with him or her to brainstorm and draw the pictures in the book, and help them sound out words as they write them. Do your best not to just give your child the spelling of a word, instead have them sound it out and if they need to, use their inventive spelling or kid writing. It is okay if the words are not spelled perfectly, it is just important for your child to use their phonetic skills to decode the words. Help your child put the book in alphabetic order by saying the alphabet with him or her, so they can listen and find the letter that comes next. Make sure you both sign your work when you are done, so you can both get credit and be proud of what you made!
Standards:
CC.2.3.2.A.1:
Analyze and draw two- and three-dimensional shapes having specified attributes.
CC.1.4.2.F:
Demonstrate a grade appropriate command of the conventions of standard English grammar and spelling.
Capitalize proper nouns.
Use commas and apostrophes appropriately.
Spell words drawing on common spelling patterns.
Consult reference material as needed.
CC.1.5.2.A: Participate in collaborative conversations with peers and adults in small and larger groups.
Materials: pencil, paper, crayons (or other coloring tool). binder or 3-ring folder.
How To Make It:
First, make sure you have your paper, pencil, and crayons, markers, or colored pencils. Have your child take one piece of paper and write "A circle can be..." at the top. Underneath, both you and your child can draw pictures of objects that look like circles, such as the sun, a smiley face, or a pizza. Have your child label each picture, so that they have practice writing as well as drawing. Then take the next page and do the same for the following shapes: rectangle, square, and triangle. Your child can also choose two of the following shapes: rhombus, pentagon, hexagon, or octagon. Once each page is drawn and labeled, have your child order them in alphabetical order, so they have a shape dictionary. Place the pages into a 3-ring folder or binder so you have a final finished project. Make sure you sign one of the pages, or you can make a cover sheet with both of your names so we know who made the dictionary!

Symmetrical Bugs
This activity is great because it allows students to be creative while also learning about symmetry. It also allows them to practice their literacy by writing and using their math vocabulary. Parents, you can either help you child make his or her bug, or you can make your own and compare them. Be creative! There are so many options with this activity that allow for some pretty amazing symmetrical bugs to be created! Just be sure that your bug(s) look the same on the right as it does on the left. Please have your child bring in their bug or pictures of their bug so that we can display it in the classroom and on our website!
Standards: Needs math standards!
Literacy - CC.1.4.2.A: Write informative/ explanatory texts to examine a
topic and convey ideas and information clearly.
CC.1.4.2.F: Demonstrate a grade appropriate command of the conventions of standard English grammar and spelling.
Capitalize proper nouns.
Use commas and apostrophes appropriately.
How To Make It:
Materials - Construction Paper, Scissors, Glue, Lined Paper, Pencil, Mirror
1. First, put your name on a large piece of paper. This will be the paper that is the base for you to glue your bug pieces.
2. Put your name on the lined paper.
3. Fold between four and six pieces of colored construction paper in half. (This way, when you cut out the shapes, you will have two of every shape).
4. Draw three large circles on three different colors of paper. These will be the body of your bug. Label them circle.
5. Draw six skinny rectangles for the legs. They can be any color. Label them rectangle.
6. Draw two skinny rectangles and two small circles for the antennas. Label them.
7. Draw two small circles for the eyes, and two even smaller circles for the pupils. Label them.
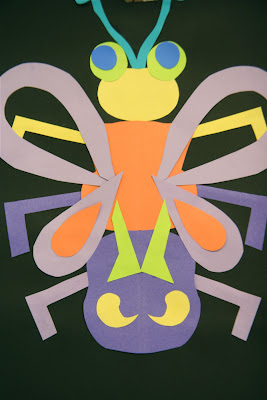
8. Begin cutting the pieces. Start by cutting out the three large (body) circles and gluing them one below the other onto the middle of the paper (sort of like a snowman).
Before cutting or gluing any more pieces, look at the reference picture. The bug should look the same on both sides - it should be symmetrical. If you are ever unsure on how to place your pieces, hold a mirror against the middle of your bug and the reflection will help you.
9. Next, cut and glue the legs. Make sure that there are the same number of legs on both sides, and they are placed so that both sides of the bug look the same.
10. Cut out the rectangles for the antennas and glue them onto the bug's head. Cut the circles, and glue them onto the top of the antennas. Be sure that they are symmetrical.
11. Cut out the eyes and pupils and glue them onto the top large circle.
12. Draw other shapes on your construction paper. You can use rectangles, squares, triangles, circles, diamonds, etc. These shapes will be cut out and used to decorate your bug. Be sure that whatever shapes are placed on the left side of the bug must look the same as the right side of the bug. Use your mirror to help you make it symmetrical.
13. When you are done assembling your symmetrical bug, use the pencil and lined paper to write three sentences that describe your bug. Use the names of the shapes you used in your sentences.
This activity is great because it allows students to be creative while also learning about symmetry. It also allows them to practice their literacy by writing and using their math vocabulary. Parents, you can either help you child make his or her bug, or you can make your own and compare them. Be creative! There are so many options with this activity that allow for some pretty amazing symmetrical bugs to be created! Just be sure that your bug(s) look the same on the right as it does on the left. Please have your child bring in their bug or pictures of their bug so that we can display it in the classroom and on our website!
Standards: Needs math standards!
Literacy - CC.1.4.2.A: Write informative/ explanatory texts to examine a
topic and convey ideas and information clearly.
CC.1.4.2.F: Demonstrate a grade appropriate command of the conventions of standard English grammar and spelling.
Capitalize proper nouns.
Use commas and apostrophes appropriately.
-
Spell words drawing on common spelling patterns.
Consult reference material as needed.
How To Make It:
Materials - Construction Paper, Scissors, Glue, Lined Paper, Pencil, Mirror
1. First, put your name on a large piece of paper. This will be the paper that is the base for you to glue your bug pieces.
2. Put your name on the lined paper.
3. Fold between four and six pieces of colored construction paper in half. (This way, when you cut out the shapes, you will have two of every shape).
4. Draw three large circles on three different colors of paper. These will be the body of your bug. Label them circle.
5. Draw six skinny rectangles for the legs. They can be any color. Label them rectangle.
6. Draw two skinny rectangles and two small circles for the antennas. Label them.
7. Draw two small circles for the eyes, and two even smaller circles for the pupils. Label them.
8. Begin cutting the pieces. Start by cutting out the three large (body) circles and gluing them one below the other onto the middle of the paper (sort of like a snowman).
Before cutting or gluing any more pieces, look at the reference picture. The bug should look the same on both sides - it should be symmetrical. If you are ever unsure on how to place your pieces, hold a mirror against the middle of your bug and the reflection will help you.
9. Next, cut and glue the legs. Make sure that there are the same number of legs on both sides, and they are placed so that both sides of the bug look the same.
10. Cut out the rectangles for the antennas and glue them onto the bug's head. Cut the circles, and glue them onto the top of the antennas. Be sure that they are symmetrical.
11. Cut out the eyes and pupils and glue them onto the top large circle.
12. Draw other shapes on your construction paper. You can use rectangles, squares, triangles, circles, diamonds, etc. These shapes will be cut out and used to decorate your bug. Be sure that whatever shapes are placed on the left side of the bug must look the same as the right side of the bug. Use your mirror to help you make it symmetrical.
13. When you are done assembling your symmetrical bug, use the pencil and lined paper to write three sentences that describe your bug. Use the names of the shapes you used in your sentences.
Symmetrical Letters
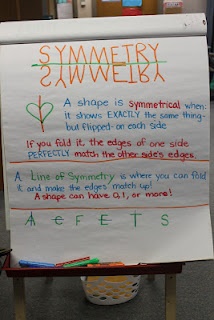
This activity allows students to practice forming words and practice the math concept of symmetry. Parents, use this activity to see how many different symmetrical words you and your child can create. You can use any line of symmetry, so you could cut a word horizontally or vertically to make it symmetrical.
Standards: needs math standards
Literacy - CC.1.4.2.F: Demonstrate a grade appropriate command of the
conventions of standard English grammar and spelling.
Capitalize proper nouns.
Use commas and apostrophes appropriately
Spell words drawing on common spelling patterns.
Consult reference material as needed.
Materials: Paper, Pencil, Notecards, Marker
How to do it:
Start by going through the alphabet and determining which letters are symmetrical horizontally. Once you have done that, see which letters are symmetrical vertically. Help your child use the marker to write each letter that is symmetrical on a notecard, so that he or she can use them to arrange words later.
Show your child how he or she can brainstorm words using the notecards. Use an example, such as HAS, and have your child determine if it is symmetrical or not. Have you child record the sample word and his or her answer on a piece of paper. Do two to four examples with your child, and have him or her write them all down. Then have your child try to create his or her own symmetrical words using the notecards and write them on the paper as well. Have your child bring in his or her list, and we will hang them in class and see how many symmetrical words we found.
